What is a robot? Sense, think, act
A robot senses, thinks and acts, again and again. See which parts of the robot car do each job, what a microcontroller is, and how the simulator runs your real code.
Key points
- A robot repeats three steps again and again: sense, think, act.
- On the robot car, the HC-SR04 senses, the Arduino Uno thinks, and the L298N with two TT motors acts.
- A microcontroller is a small computer on one chip; the Uno's chip is the ATmega328P.
- The battery powers the motors through the L298N, and the L298N's 5 V output powers the Uno.
- The simulator compiles your real sketch and runs it on an emulated ATmega328P.
A robot is a machine that does three things again and again. It senses the world around it. It thinks: it decides what to do. Then it acts: it moves or changes something. After it acts, it senses again, because the world has changed. Robotics engineers call this the sense-think-act loop.
A toy car with a remote control has motors and a battery. But a person does the sensing and the thinking for it. Give the car a sensor and a small computer, and it can make its own decisions. That is the step from a machine to a robot.
Sense, think, act on the robot car
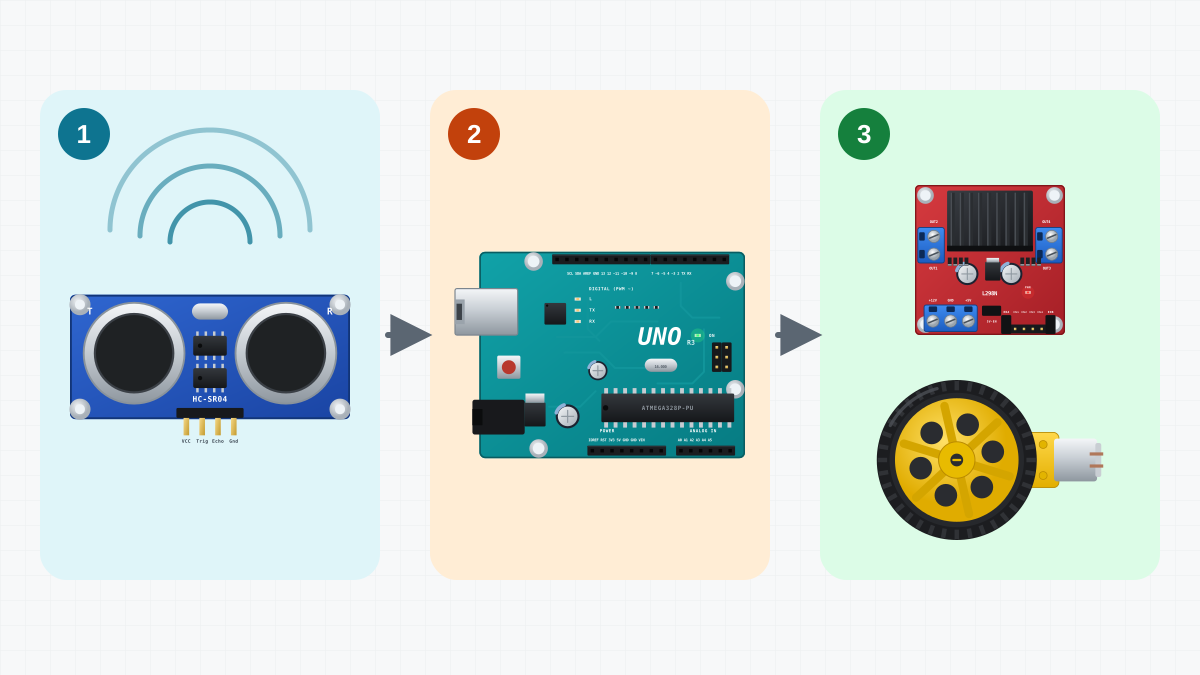
The robots on this site share one design: the CoreEngine robot car. Each of its parts has one main job.
| Part | Job | What it does on the robot car |
|---|---|---|
| HC-SR04 ultrasonic sensor | Sense | Measures the distance to the nearest object in front, from about 2 cm to 4 m |
| Arduino Uno | Think | Runs your sketch: reads the sensor, decides, sends signals |
| L298N motor driver | Act | Turns the Uno's small signals into strong current for the motors |
| Two TT gear motors with 65 mm wheels | Act | Move the robot; different speeds on the two sides make it turn |
| 4xAA battery holder | Power | About 6 V for the motors, and through the L298N for the Uno and the sensor |
| Two acrylic decks and a ball caster | Body | Hold everything together; the caster rolls at the front |
Sense
The HC-SR04 sends a short burst of ultrasound, too high for people to hear. Then it listens for the echo. The longer the echo takes, the farther away the object is. The sensor does not know what the object is. It only knows how far away it is.
Other robots use other sensors. A line sensor sees a black line on a white floor, and a switch can feel a bump. The Line follower uses two line sensors to follow a track.
Think
The Arduino Uno reads the sensor and runs your sketch, the program you wrote. The sketch holds the robot's rules, for example: "If something is closer than 25 cm, turn away." The Uno checks these rules many times a second.
Act
The Uno's pins can only give small signals, about 20 mA each. A TT motor needs about 0.3 A while it drives the robot, and up to about 1 A when it is blocked. So the Uno sends its signals to the L298N motor driver. The L298N switches the battery's current to the motors: forwards or backwards, fast or slow.
The robot has no steering wheel. It steers with its two driven wheels:
- Both wheels forwards at the same speed: it drives straight.
- One wheel faster than the other: it drives in a curve.
- One wheel forwards and the other backwards: it spins on the spot.
Power
Nothing works without energy. The four AA cells give about 6 V. The motors get this power through the L298N. The L298N also has a small 5 V regulator. Its 5 V output powers the Uno and the sensor.
One pass of the loop
The obstacle avoider shows the loop at work. Its sketch uses these numbers:
- Sense: measure the distance every 60 ms, about 16 times a second.
- Think: is the object closer than 25 cm?
- Act: if not, drive ahead at speed 190 (the scale goes from 0 to 255). If it is closer, drive backwards at speed 160 for 300 ms, spin right at speed 170 for 380 ms, and then drive ahead again.
Then the loop starts again with a new measurement. The robot never stops sensing, not even while it drives backwards and turns. The lesson Programs that never wait shows how the sketch does that.
What is a microcontroller?
A microcontroller is a complete small computer on one chip. It has a processor, memory for the program, memory for data, and pins that connect it to the outside world. Microcontrollers are in many things around you: a washing machine, a microwave oven, a TV remote control, a car.
The Uno's microcontroller is the ATmega328P:
| Feature | ATmega328P on the Uno |
|---|---|
| Clock | 16 MHz: 16 million clock ticks a second |
| Flash memory | 32 KB: holds your sketch, also when the power is off |
| RAM | 2 KB: holds your variables while the sketch runs |
| EEPROM | 1 KB: keeps small values, such as settings, when the power is off |
| Pins | D0-D13 (digital) and A0-A5 (analog inputs) |
A laptop has millions of times more memory. The Uno does not need it. It has no screen, no keyboard and no operating system. It runs one program, your sketch, as soon as it gets power.
The program for an Arduino board is called a sketch. You write it in C++ in the Arduino IDE. When you press Upload, the IDE compiles your sketch into machine code and writes it into the flash memory.
The pins connect the sketch to the world. As an output, a pin gives about 5 V (HIGH) or 0 V (LOW), for example to switch an LED on and off. As an input, a pin tells the sketch whether the voltage on it is high or low, for example the signal from a sensor. The lesson Arduino Uno: pins and your first program looks at the pins in detail.
What the simulator does
CoreEngine is a robot simulator for Windows. In it, you build a robot from the same parts as the real robot car, and you test it before you build it for real.
- Build. You make the body from shapes and place models of real parts on it: the Arduino Uno, the L298N, the HC-SR04, TT motors, the battery holder, a ball caster, an SG90 servo and an LED module.
- Wire. You connect the parts pin to pin, as on the real robot.
- Check. The simulator checks your wiring. It tells you, for example, when there is no battery, when the motor driver has no power, when the grounds are not joined, or when the battery goes to the Uno's 5V pin. That last mistake burns a real board.
- Code. You write the sketch in a built-in Arduino IDE, with Verify and Upload buttons.
- Run. Your sketch is compiled with arduino-cli, which uses the same compiler as the Arduino IDE. The machine code then runs on an emulated ATmega328P: a program that behaves like the real chip. It is the same program a real Uno would run, not a simplified copy.
- Test. The robot drives in an arena with physics. You see a live readout of the distance, the motors and the battery, a Serial Monitor with your sketch's messages, and an event log.
On the desk in the Garage, the Uno runs from the laptop's USB and LEDs light up. So you can try LED projects without a battery.
The simulator does not replace real parts. It lets you try ideas quickly and find mistakes before they cost you a part.
How to use this site
| Step | What you do |
|---|---|
| 1. Learn | Read a lesson or a project. Each lesson has key points, questions and a small task. |
| 2. Simulate | Build the page's robot in CoreEngine: the page lists its parts, its wiring and its sketch. Run it, change the code and see what happens. |
| 3. Get the parts | Each project lists its parts with links to shops. The Market shows where to buy the same parts. |
| 4. Build | Build the real robot with the same wiring table and upload the same sketch. |
| 5. Share | Show others your robot, your changes to the sketch and what you learned. |
You can repeat these steps as often as you like. Each new idea starts again at step 1 or step 2.
Try it now
Open the obstacle avoider and watch sense, think and act happen.
What you will see:
- The robot drives straight ahead.
- The live distance readout gets smaller as a wall comes closer.
- Below 25 cm, the robot drives backwards for a moment, spins to the right and drives on.
- The Serial Monitor prints a new distance about every 60 ms, also while the robot turns.
Where to go next
- Arduino Uno: pins and your first program, then the Blink project.
- Motors and the L298N driver, then the First drive project.
- Measuring distance with the HC-SR04.
- Programs that never wait: millis() and states, then the Obstacle avoider.
- The Keep distance robot, which follows your hand.
Check yourself
1On the robot car, which part senses, which part thinks and which parts act?
The HC-SR04 senses the distance, and the Arduino Uno thinks by running your sketch. The L298N motor driver and the two TT motors act.
2Why is there a motor driver between the Uno and the motors?
A Uno pin gives only about 20 mA safely, but a TT motor needs up to about 1 A. The L298N switches the battery's current to the motors.
3What happens to your sketch when you press Upload in the simulator?
It is compiled into machine code, as for a real board. That machine code runs on an emulated ATmega328P inside the simulated robot.
Task
Build the obstacle-avoiding robot in the simulator (its project page shows how) and run it in an arena. Watch the live distance readout and note the distance at which the robot starts to drive backwards. Then change STOP_CM from 25 to 40, upload the sketch and run it again. Compare where the robot turns now.
Hint
STOP_CM is one of the settings near the top of the sketch.